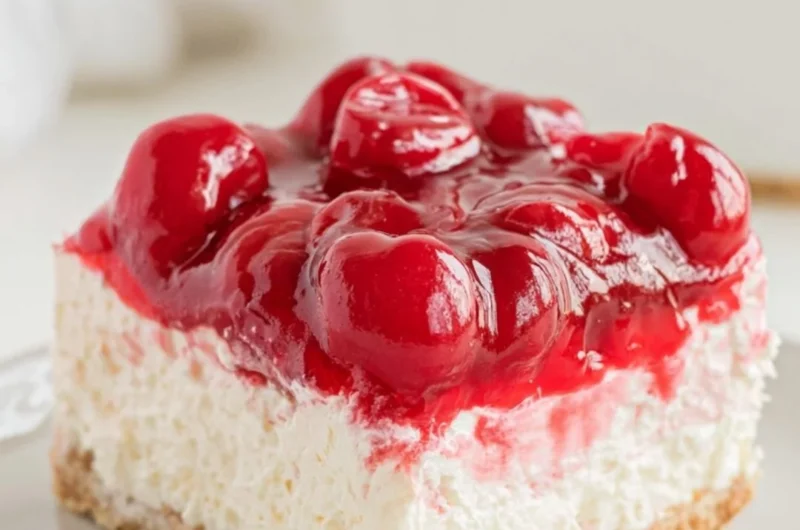
A Cozy No Bake Cherry Cheesecake to Sweeten Your Day
As the leaves turn golden and the air gets crisp, there’s something so comforting about gathering in the kitchen and creating sweet memories. One of my favorite childhood treats was my grandmother’s cherry cheesecake. But let’s be real—who has time in their busy life for baking a cheesecake that requires hours in the oven? That’s where this creamy No Bake Cherry Cheesecake comes in. It captures the same nostalgic flavors of my childhood, but with the simplicity and ease perfect for today’s fast-paced world. Whether it’s a family gathering, a cozy night in, or just a sweet treat for yourself, this is one you’ll definitely want to pin for later!
Why You’ll Love This Recipe
- Quick and Easy: No baking required! This dessert comes together in just a few simple steps, making it perfect for a busy weeknight treat.
- Creamy and Dreamy: The rich, velvety cream cheese filling paired with a crumbly crust creates a heavenly texture that’s hard to resist.
- Crowd-Pleasing Delight: Impress your friends and family with this gorgeous dessert that looks as good as it tastes. It’s bound to be a hit at any gathering!
- Versatile Flavors: Feel free to switch up the toppings or toss in some favorite flavors for a customized dessert that suits your tastes.
- Make-Ahead Friendly: You can prepare this cheesecake a day in advance, letting it chill overnight for an even more magical experience!
What You’ll Need
Gather these simple ingredients to whip up this delightful No Bake Cherry Cheesecake:
For the crust:
- 1 ½ cups graham cracker crumbs
- ½ cup unsalted butter, melted
- ¼ cup granulated sugar
For the filling:
- 16 ounces cream cheese, softened
- 1 cup powdered sugar
- 1 teaspoon vanilla extract
- 1 cup heavy whipping cream
For the topping:
- 1 can cherry pie filling (or homemade cherry compote)
Let’s Make It Together
Ready to create something amazing? Follow these simple steps to make your very own No Bake Cherry Cheesecake:
Prepare the crust: In a medium bowl, combine graham cracker crumbs, melted butter, and granulated sugar. Mix until well combined, then press the mixture tightly into the bottom of a 9-inch springform pan. Set aside while you prepare the filling.
Make the filling: In a large mixing bowl, beat the softened cream cheese with an electric mixer until smooth and creamy. Gradually add in the powdered sugar and vanilla extract, continuing to mix until well combined.
Whip the cream: In a separate bowl, whip the heavy cream until soft peaks form. Carefully fold the whipped cream into the cream cheese mixture until fully incorporated, creating that luscious filling.
Assemble the cheesecake: Pour the cream cheese filling over the prepared crust, smoothing the top with a spatula. Cover and refrigerate for at least 4 hours or overnight, allowing it to set perfectly.
Top with cherries: Once set, gently spread the cherry pie filling over the top of the cheesecake. Allow the cherry topping to sit for a few minutes before slicing.
Serve and enjoy: Slice into wedges and serve chilled. Your No Bake Cherry Cheesecake is now ready to bring joy to your table!
Fun Ways to Customize It
Feeling inspired to create your own flavor masterpieces? Here are some delicious variations to try:
- Zesty Lemon Cheesecake: Substitute lemon zest and lemon juice for part of the vanilla for a zesty twist.
- Chocolate Lovers Delight: Fold in cocoa powder into the cream cheese mixture and top with chocolate ganache instead of cherries.
- Seasonal Berry Mix: Use fresh strawberries or blueberries instead of cherries for a summery vibe.
- Nutty Crunch: Add chopped nuts like pecans or walnuts into the crust for added texture and nuttiness.
Chef Emma’s Helpful Tips
To help you achieve the best results, here are my best kitchen secrets:
- Room Temperature Cream Cheese: Make sure your cream cheese is at room temperature for a smooth and creamy filling.
- Whipping the Cream: For best results, chill the mixing bowl and beaters before whipping the cream. This helps it whip up to fluffy perfection more easily.
- Cutting the Cheesecake: Run a knife under hot water and dry it off before slicing to get clean cuts.
- Storage Suggestions: Store leftovers in an airtight container in the refrigerator for up to 3 days, if they last that long!
What’s Inside – Nutrition Breakdown
Each serving of this No Bake Cherry Cheesecake (approx. 1 slice) contains:
- Serving Size: 1 slice
- Calories: 320
- Carbohydrates: 29g
- Sugar: 19g
- Fat: 23g
- Protein: 3g
- Sodium: 220mg
Frequently Asked Questions
Can I make this ahead?
Absolutely! This cheesecake is perfect for making a day in advance. Just let it chill so the flavors meld beautifully.
Can I use different ingredients?
Of course! Feel free to swap out the cherry topping for any other fruit filling you love, like strawberries or blueberries.
How do I store leftovers?
Store any leftover cheesecake in an airtight container in the fridge for up to 3 days.
How long does it last?
If stored properly in the fridge, your No Bake Cherry Cheesecake can last up to 3 days, but it’s best served fresh!
A Cozy Closing Note
This No Bake Cherry Cheesecake is more than just a dessert; it’s a sweet reminder of simpler times and cherished family gatherings. Share it with loved ones or savor it solo—either way, it’s bound to bring a smile. Save this recipe to your dessert board so it’s ready when you need a cozy treat! Happy baking (or should I say, assembling)!

No Bake Cherry Cheesecake
- Total Time: 240 minutes
- Yield: 8 servings 1x
- Diet: Vegetarian
Description
A creamy and easy No Bake Cherry Cheesecake that’s perfect for any occasion.
Ingredients
- 1 ½ cups graham cracker crumbs
- ½ cup unsalted butter, melted
- ¼ cup granulated sugar
- 16 ounces cream cheese, softened
- 1 cup powdered sugar
- 1 teaspoon vanilla extract
- 1 cup heavy whipping cream
- 1 can cherry pie filling (or homemade cherry compote)
Instructions
- Prepare the crust: In a medium bowl, combine graham cracker crumbs, melted butter, and granulated sugar. Mix until well combined, then press the mixture tightly into the bottom of a 9-inch springform pan. Set aside while you prepare the filling.
- Make the filling: In a large mixing bowl, beat the softened cream cheese with an electric mixer until smooth and creamy. Gradually add in the powdered sugar and vanilla extract, continuing to mix until well combined.
- Whip the cream: In a separate bowl, whip the heavy cream until soft peaks form. Carefully fold the whipped cream into the cream cheese mixture until fully incorporated, creating that luscious filling.
- Assemble the cheesecake: Pour the cream cheese filling over the prepared crust, smoothing the top with a spatula. Cover and refrigerate for at least 240 minutes or overnight, allowing it to set perfectly.
- Top with cherries: Once set, gently spread the cherry pie filling over the top of the cheesecake. Allow the cherry topping to sit for a few minutes before slicing.
- Serve and enjoy: Slice into wedges and serve chilled. Your No Bake Cherry Cheesecake is now ready to bring joy to your table!
Notes
Prepare a day ahead for best results. Customize with your favorite toppings like strawberries or blueberries.
- Prep Time: 15 minutes
- Cook Time: 0 minutes
- Category: Dessert
- Method: No Bake
- Cuisine: American
Nutrition
- Serving Size: 1 slice
- Calories: 320
- Sugar: 19g
- Sodium: 220mg
- Fat: 23g
- Saturated Fat: 14g
- Unsaturated Fat: 7g
- Trans Fat: 0g
- Carbohydrates: 29g
- Fiber: 1g
- Protein: 3g
- Cholesterol: 70mg